A community site is not just a place for people to chat. Done right, it becomes the campfire for your online business. It is where your audience gathers, learns, asks questions, and starts to feel like they belong.
That matters because online business can get scattered fast. You have emails going out, social posts floating around, course content sitting in one place, customer questions coming in from another, and half your audience forgetting where to find what they need. Not exactly a smooth operation.
When you create a community site, you give your people one clear place to come back to. It becomes the home base for your course, coaching program, membership, digital product, or customer group. Instead of chasing people across inboxes and social feeds like you are rounding up cattle in a windstorm, you can bring them into one organized space.
The best part? A good community does more than keep people engaged. It helps build trust. It gives customers support. It helps members learn from each other. And it gives you a better way to stay connected without having to answer the same question 47 times before lunch.
In this guide, we will break down what a community site is, why it matters, and how it can support your online business. Then we will look at how GoHighLevel helps you create a community site and walk through the basic setup process so you can build something useful, simple, and worth coming back to.
Because when you create a community site the right way, you are not just adding another online tool. You are building a place where your people can connect, learn, and stick around.
What Is a Community Site?
A community site is an online space where your people can gather around your business, your content, and each other. It can be public or private, simple or advanced, free or paid. The main idea is the same: it gives your audience one place to connect, ask questions, share wins, and stay involved.
When you create a community site, you are building more than a message board. You are creating a home base. This is where your students, members, customers, or clients can find helpful content, join discussions, attend events, and feel like they are part of something instead of just another name on an email list.
Think of it like the difference between a roadside bulletin board and a proper town hall. A Facebook group or email list can help you get a message out, but they are not always easy to organize. Posts get buried. People miss updates. Good questions disappear under a pile of memes, promo posts, and whatever the algorithm decided to serve that day.
A community site gives you more control. You can organize conversations by topic, connect learning content, add events, manage members, and guide people toward the next step. That is a big deal when you sell courses, coaching, memberships, or digital products.
A good community site can include:
- Member discussions
- Course or training content
- Private groups
- Topic-based channels
- Live events or workshops
- Announcements
- Rewards and engagement tools
- Customer support conversations
The goal is not to make things fancy. The goal is to make things useful.
When you create a community site, you give your audience a place that feels clear, organized, and connected to your business. Instead of sending people all over the internet to find answers, you give them one steady place to come back to.
That alone can make your online business feel less scattered and more human. And let’s be honest, most people do not need another random login collecting dust. They need a helpful space that makes it easier to learn, connect, and keep moving.
If you create a community site with that in mind, it becomes part of the customer experience, not just another tool bolted onto the side of your business.
Why a Community Site Matters for Your Online Business
Getting someone to buy is one thing. Keeping them connected after they buy is where the real work begins.
That is why it can be so helpful to create a community site for your online business. It gives your audience a place to stay close to your brand after the first sale, download, lesson, or webinar. Instead of letting people wander off into the digital weeds, you give them a clear path back.
For course creators, this matters because students often need more than lessons. They need encouragement, answers, reminders, and a place to see that other people are working through the same things. A course without support can feel like being dropped off in the middle of a field with a map and no boots. Sure, they can figure it out, but they are more likely to keep going when they are not doing it alone.
For solopreneurs and digital product sellers, a community site helps build trust over time. Your members get to see how you think, how you help, and how your business shows up. That steady connection can do more than a dozen random social posts that disappear by supper.
When you create a community site, you can also make support easier. Instead of answering the same question again and again in emails or DMs, you can answer it once where everyone can see it. Better yet, members may start helping each other. That is when the community starts pulling some weight.
A community site can help your business by:
- Keeping customers engaged after they buy
- Giving students or members a place to ask questions
- Creating a stronger sense of trust and belonging
- Making customer support easier to manage
- Helping you see what your audience actually needs
- Encouraging repeat purchases, renewals, or referrals
It also helps your online business feel less like a transaction and more like a relationship. That matters, especially for people who come from small towns, local businesses, service work, or hands-on industries. They know the value of a handshake, a good reputation, and showing up when people need you.
Online business does not have to lose that personal touch. When you create a community site, you bring some of that connection back into the digital world. It gives your people a place to gather, and it gives your business a stronger foundation than just chasing clicks, likes, and the latest platform trend.
How a Community Site Helps Course Creators and Online Business Owners
When you create a community site, you give your audience more than content. You give them a place to stay connected while they learn, ask, test, and grow. That is a big deal when you sell courses, coaching, memberships, or digital products.
A lot of people buy online programs with good intentions. They are fired up on day one. Then life happens. The tractor breaks down, the inbox fills up, the kid needs help moving, or the day job runs late. Before long, that course they bought is sitting untouched like a gym membership in February.
A community can help pull them back in.
For course creators, a community site gives students a place to ask questions and get support. They can share wins, talk through roadblocks, and see that they are not the only ones figuring things out. That little bit of connection can help people keep going when they would normally stall out.
For solopreneurs, it helps build trust without needing to be glued to your phone all day. You can answer common questions, share updates, start useful discussions, and point people toward your best resources. When members can also help each other, the whole thing becomes less of a one-person rodeo.
For business owners adding online marketing to an existing business, a community site can keep the personal touch alive. Maybe you are used to serving people face to face, shaking hands, remembering names, and knowing who needs what. When you move more of your business online, it can feel colder than a January morning. A community helps bring some warmth back.
When you create a community site, it can help you:
- Support students without answering everything one-on-one
- Keep members engaged between lessons, calls, or launches
- Learn what your audience is struggling with
- Build stronger relationships with buyers
- Turn customer questions into helpful content ideas
- Give members a reason to come back regularly
It also gives you a better way to listen. If five people ask the same question, that may be your next lesson, email, workshop, or offer. Your community becomes a live feedback loop instead of a guessing game.
That is where the real value starts to show up. When you create a community site, you are not just building a place for posts and comments. You are building a relationship system. One that helps your audience feel supported and helps your business stay closer to the people it serves.
How GoHighLevel Helps You Create a Community Site
When you are ready to create a community site, the tool you choose matters. You do not want something that feels like it was duct-taped together in the back of the shop. You want a space that is organized, branded, and easy for members to use.
That is where GoHighLevel Communities can help.
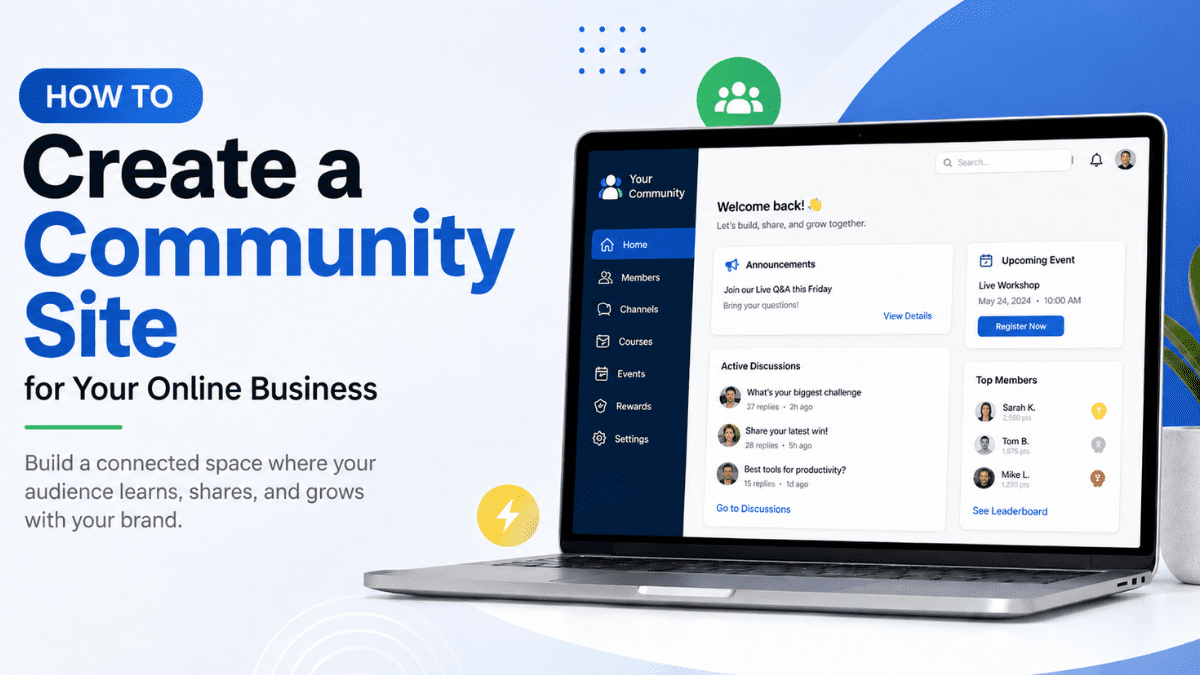
GoHighLevel’s Communities feature lets you create private or public spaces where members can interact, access content, and build relationships. It is built for businesses, educators, and content creators who want one place to manage engagement, content, members, and communication.
This is useful because most online business owners are already juggling enough tools. One platform for email. Another for courses. Another for events. Another for customer notes. Another for follow-up. Pretty soon, your tech stack looks like a junk drawer with a login screen.
With GoHighLevel, you can create a community site that connects with other parts of your online business. Inside Communities, you can manage groups, memberships, roles, custom branding, domains, channels, courses, events, and rewards. HighLevel also lists benefits like centralized engagement, custom branding, membership management, scalability, and integrations with automation, email marketing, and CRM features.
For a course creator, this means your students can access learning content and discussions in one place. For a coach, it can become a home for client questions, live sessions, and group support. For a business owner moving online, it gives you a cleaner way to keep your people connected without sending them across five different platforms.
The big win is control. You are not building only on rented social media land. You are creating a branded space that belongs to your business and supports the customer experience.
When you create a community site with GoHighLevel, you can keep things simple at first. Start with one group, a few channels, and a clear purpose. Then you can add courses, events, rewards, or private areas as your community grows.
No need to build the whole barn before you know how many horses you have.
How to Set Up a Community in GoHighLevel
Setting up a community in GoHighLevel gives your audience one place to connect, ask questions, access content, and stay involved with your business. Instead of sending people across social media groups, email threads, and random course links, you can keep the experience in one cleaner space.
In the steps below, you will create a community site, add your community group details, set your password, and manage the first pieces of your community, including settings, members, and channels.
- Create a new community
- Create your community group
- Create password to access your Community Portal
- Manage and invite members
To start make sure you are logged in to your GoHighLevel sub-account.
Step 01 – Create a new community
The first step is to access the Communities area inside GoHighLevel. This is where you will begin creating the main space your members will use to connect with your business.
1.1 Click Memberships.
- This opens the Memberships area inside GoHighLevel.
1.2 Go to the Communities tab.
- This is where your communities are created and managed.
1.3 Click Create New Community.
- This starts the setup process for your new community.
When you create a community site, this step gives you the foundation. Think of it like marking the land before building the shop. You are not done yet, but now you have a place to start.

Step 02 – Create your community group
Next, you will enter the details for your community group. This is the information members will see, so keep it clear and easy to understand.
2.1 Enter your Group Details.
- Add the group name.
- Add the group URL.
- Add a clear description.
- Scroll down to complete any additional fields.
Your group name should make sense right away. Avoid being too clever here. If people need to squint at the name and wonder what they joined, that is not a great start.
2.2 Click Create Group.
This creates the group and moves you to the next part of the setup.
When you create a community site, your group details help set the tone. A clear name and description tell members what the space is for, who it helps, and why they should use it.


Step 03 – Create password to access your Community Portal
After your group is created, GoHighLevel will ask you to create a password for your Community Portal. This gives you access to the portal where you can manage and use the community.
3.1 Enter the Password you prefer.
- Choose a password you can remember, but do not make it too simple.
- Use a strong password to help protect your community access.
3.2 Click Set Password.
- This saves your password and gives you access to the Community Portal.
This step is simple, but important. Your Community Portal is where the real work starts, so keep your login details safe. No sticky note on the monitor, please. We are better than that.

Step 04 – Manage and invite members
Once your Community Portal is ready, you can begin managing the community experience. This includes adjusting your settings, inviting members, and creating channels so conversations stay organized.
4.1 Manage your Community Settings.
- Review your community name, branding, access settings, and other setup options.
- Make sure the community looks and feels connected to your business.
- Check that the basic details are correct before inviting members.
This helps your community feel professional from the start. When people land inside, they should know they are in the right place.
4.2 Invite Members.
- Add the people you want to invite into the community.
- Send invitations to students, customers, clients, or members.
- Start with a focused group if you want to test the experience before opening it wider.
You do not need to invite the whole county on day one. Start with the right people, make sure the setup works, then grow from there.
4.3 Add new Channels.
- Create channels for the main topics your members need.
- Keep your first channels simple and useful.
- Good starter channels may include Announcements, Start Here, Questions, Wins, and Events.

Channels keep your community from turning into a junk drawer. When you create a community site, organized channels help members know where to post, where to find answers, and how to get involved without feeling lost.
The goal is not to build the fanciest community on the internet. The goal is to build a useful space your people can understand, use, and come back to.
Tips for Making Your Community Site Useful
Setting up the tech is only part of the job. The real work starts after you create a community site and invite people in.
A community is a bit like a small-town coffee shop. If nobody starts a conversation, it gets awkward fast. But when people feel welcome, know where to go, and see real value, they start showing up on purpose.
The key is to keep the community simple, useful, and active. You do not need 27 channels, a giant welcome video, and a reward system that looks like it came from NASA. Start with the basics and build from there.
Here are a few practical ways to make your community site worth using:
- Start with a clear purpose.
- Tell members what the community is for and how they should use it. Are they there to get course support? Join coaching calls? Ask questions? Share wins? Make that clear from day one.
- Keep your channels simple.
- When you first create a community site, do not overbuild it. Start with a few clear channels like Announcements, Start Here, Questions, Wins, and Events. You can always add more later.
- Welcome new members.
- A simple welcome post can go a long way. Tell people where to start, what to expect, and how to introduce themselves. Nobody likes walking into a room where everyone stares and nobody says hello.
- Post easy prompts.
- Ask questions people can answer without writing an essay. Try things like, “What are you working on this week?” or “What is one win from the last few days?” Simple prompts get more replies.
- Highlight member wins.
- People love seeing progress. Share wins, milestones, and good questions from members. It makes the community feel alive and shows others what is possible.
- Use the community to guide your content.
- If people keep asking the same question, that is not annoying. That is market research wearing work boots. Turn those questions into lessons, emails, videos, or new offers.
- Show up consistently.
- You do not need to live in the community all day. But you do need to be present. A few thoughtful replies and regular updates can keep the fire going.
When you create a community site, remember that people do not come back just because the platform looks nice. They come back because the space helps them. It saves them time, answers their questions, gives them encouragement, or helps them feel connected to people walking the same road.
That is the goal.
Build a community that feels useful first. The fancy stuff can come later.
Common Mistakes to Avoid When You Create a Community Site
It is easy to get excited when you create a community site. You start thinking about channels, events, member levels, courses, rewards, badges, private groups, and all the shiny stuff.
Then two weeks later, the place is quieter than a back road at midnight.
The problem is usually not the idea. The problem is the setup. A good community does not need to be complicated. It needs to be clear, active, and useful.
Here are a few common mistakes to avoid.
Creating too many channels too soon
More channels do not make a better community. They often make people confused.
Start with a few simple areas like:
- Start Here
- Announcements
- Questions
- Wins
- Events
You can add more later when there is a real reason. When you create a community site, simple structure makes it easier for people to know where to post and what to do next.
Making it all about announcements
A community site should not feel like a bulletin board nailed to a fence post.
Yes, announcements matter. But if all you do is post updates and never invite people into the conversation, members will stop checking in. Ask questions. Start discussions. Share useful prompts. Give people a reason to reply.
Community works best when it feels like a two-way road, not a loudspeaker.
Forgetting to welcome people
When someone joins your community, do not leave them standing at the door holding their hat.
Create a simple welcome post or start-here area. Tell members what the community is for, where to begin, and how to ask questions. A clear welcome helps people feel comfortable faster.
Posting once and disappearing
This one hurts a lot of communities.
You launch strong, post a few times, then vanish. Members notice. If the owner is not showing up, they will not feel much reason to show up either.
You do not need to be in there all day. But you do need a rhythm. Weekly prompts, monthly events, regular check-ins, and quick replies can keep the place alive.
Making the setup too complicated
Do not build a maze and call it a community.
If members need a five-minute video just to find the right channel, something is off. Keep your structure easy. Give clear names to groups and channels. Make the next step obvious.
When you create a community site, your goal is to remove friction, not add more of it.
Not connecting the community to your business goal
A community should serve your members, but it should also support your business. That does not mean pitching people every day. Please do not do that. Nobody joins a community because they want to be chased around with offers.
Instead, connect the community naturally to your course, coaching, membership, product, or service. Use it to support buyers, answer questions, host events, gather feedback, and guide people toward the next helpful step.
When you create a community site with a clear purpose, it becomes easier to manage and more valuable for members.
The big lesson? Simple and active beats fancy and empty every time.
Conclusion
When you create a community site, you are doing more than setting up another online space. You are giving your audience a place to gather, learn, ask questions, and stay connected to your business.
That matters because online business can feel scattered. People buy a course, download a resource, join a program, or sign up for a membership, then life gets busy. If there is no clear place for them to return to, they can drift away without meaning to.
A good community helps fix that. It gives your people a home base. It helps course creators support students, solopreneurs build trust, and business owners keep the personal touch as they move more of their work online.
Start simple. Give your community a clear purpose. Create a few useful channels. Welcome people well. Show up consistently. Then let the space grow as your members show you what they need.
And if you want your community, courses, events, follow-up, and customer tools working together in one place, GoHighLevel is worth a serious look. It gives you a practical way to create a community site without stitching together a pile of disconnected tools and hoping they behave.
No need to overcomplicate it.
Build the place. Invite your people in. Keep it useful. Keep it human.
That is how you create a community site that supports your online business for the long haul.